Finishing Techniques
We understand the important role that kitchen and bath cabinetry play in defining a home's personality. Research has shown that over 80% of purchases are made based on the color of these two important rooms. Having a large selection of colors and wood species available is essential in today's rapidly changing market. With the consumer's ability to experience different colors, wood species and textures through mediums such as the internet and magazines, the market place goes through “the in-thing” at an alarming rate. These trends naturally create an appetite for new colors very quickly. These rapid changes in style have forced all cabinet manufacturers to increase their selection of stain, paint and glaze colors and techniques on a larger selection of wood species than ever. Our collaboration with world-renowned color experts, including those with the Akzo Nobel Valspar group, give us a distinct advantage in this area. This knowledge, in turn, enables our customers to offer the most desirable products to the marketplace. Elias Woodwork's selection of products is constantly evolving and our design team is working hard at keeping up with the fast pace of change in today’s kitchen and bath industry.
The following section is devoted to explaining the products, equipment and procedures used to achieve the top quality coatings that we are proud to offer. Elias Woodwork works hard to maintain the best quality and step-by-step procedures for all stains, paints, glazes and top coats and our goal is that you will notice the difference.
We are constantly driven to making our industry more sustainable. Our products are formulated to have a reduced impact on the environment without sacrificing performance and durability. Over-spray that occurs on the flat line spray machines is captured and remixed back into the system keeping waste to a minimum.
Clear Coats
Stains
NOTE: The final colour of any wood stain is always a combination of the stain itself, and the colour of the underlying raw wood. No two trees are the same, and some range in finish colour should be expected due to variations in raw wood colour, grain, texture, density, and age. Darker stains will more readily hide the colour variations within a given wood species. The lighter the stain finish, the more the natural woodgrain and colour variations will show through.
SPRAY STAIN: Our spray stains are applied by spraying the stain onto the product and allowing it to dry. Spray equipment and spraying technique are major factors that influence the colour and look of a spray stain. We apply our spray stains using machines whenever possible, in order to ensure more colour and finish consistency. As with any stain finish, solid lumber and veneer of the same species may not match exactly, due to the fact that veneer tends to absorb stain more readily than solid wood. Only experienced finishers should attempt to apply spray-stain finishes.
WIPE STAIN: Our wipe stains are applied by spraying the stain onto the product, and then immediately wiping it off with a rag. It’s important to note that a wipe stain can result in a somewhat blotchy “rustic” look, depending on the wood grade and species. Maple is a common species that is particularly prone to this blotchy “rustic” wipe stain effect. The colour and darkness of a given wipe stain can also appear significantly different on solid wood versus veneer, which is particularly noticeable on plywood panel shaker doors with solid wood frames. Wipe stains can result in a very pleasant look, depending on taste, and are best suited to individuals who are comfortable with more colour variation across their product.
Please ask your Customer Service Specialist for a complete stain sample set.
See available stain colors in our Inspiration Gallery here.
Solid Color Lacquer (Paint)
See our Solid Color Collection in the Inspiration Gallery.
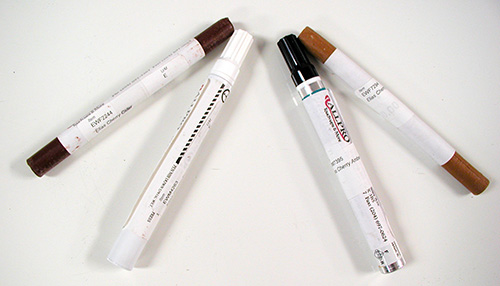
Touch Up Kits
Priming Only
Molding – Our standard procedure is to use a white primer and spray the face and edges of the molding only. The molding will not be scuff sanded after the primer has been applied. Please inquire if different specifications are required.
Raised panel cabinet doors – The MDF raised panel will be primed with white primer prior to assemble. The flat surface of the panel and the profiled edge of the panel will be scuff sanded prior to assembly of the door. Then the entire door will be primed with white primer. After this coat of primer has been applied the door is not scuff sanded. Please inquire if different specifications are required.
Recessed panel cabinet doors – MDF flat insert panels will be primed with white primer prior to assembly. Then the entire door will be primed with white primer. After this coat of primer has been applied the door is not scuff sanded. Please inquire if different specifications are required.
Miscellaneous Accessories – Most accessories can be primed. Our standard default primer color is white. After the primer has been applied the accessories are not scuff sanded. Please inquire if different specifications are required.
Sheen
Flat Sheen is optional for stained or clear coated products.
Low 10° sheen is the default for solid color lacquers.
Glazes
See Samples of Glaze Colors and Techniques in the Inspiration Gallery.
Glaze Techniques Defined
| Artisan Glaze This technique produces straight, clean glaze lines. The glaze is sprayed onto the cabinet door, and then hand-rubbed off, remaining in the grooves and corners of the cabinet door. The part of the product that does not have glaze on it will be cleaned off entirely, giving a crisp and clean contrast between the glazed and non-glazed areas. (Elias code = “A”) Image showing Artisan Licorice Glaze on Satin White 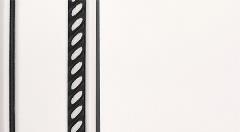 |
| Feathered Glaze This technique has a heavier build of glaze in the deeper grooves and fades off into the smooth flat areas. The Feathered technique allows for some glaze to appear on the smooth surfaces but will be most concentrated in the grooves and corners of the doors. Most would agree that this look gives you a more “old” or “antiqued” look. (Elias code = “F”) Image shows Feathered Mocha Glaze on Sandstone 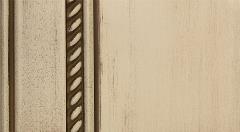 |
| Brushstroke Glaze This wet glaze does not dry instantly and can be “worked with” while wet for a short period of time. We manipulate the wet glaze with a brush, creating a “grain” direction on the surface of the door. This technique reproduces a look similar to a antique cabinet door, recreating the feeling of a home from another time. (Elias code = “B”) Image shows Brushstroke Portabello Glaze on Cinder Grey 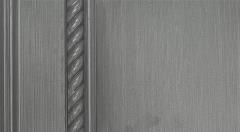 |
| |
Product Aging Techniques
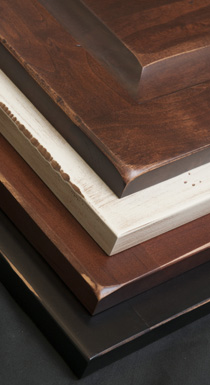
The art of producing a product that appears old and antique is a highly subjective topic. We work hard to create a piece of art out of every cabinet door while also trying to maintain uniformity throughout the entire kitchen. We understand that every kitchen needs to look naturally aged, creating the feeling of an old, quality made and timeless piece of furniture. Our goal is to create the appearance and feeling of quality made woodwork that was produced one hundred years ago, when handwork prevailed and longevity was paramount. The aging process is done by hand and carefully follows our proprietary process, insuring a systematic, consistent outcome. We have succeeded in creating a correctly aged door when you find yourself saying; “I wish these doors could talk because I am sure they have a story to tell.” Please read the following to help understand the differences in our techniques.
Please note the following defaults with our aged cabinet doors.
All of our aging techniques are applied to solid wood, raised panel cabinet doors. Through research we have found the following Elias Woodwork profile closely represents the correct time period and compliments this aging process - Code = E500, 201(57.2 Style width), O (panel), B (outside edge). We always protect our products after aging with a 10° (low sheen) clear top coat. When an order includes parts and accessories such as moldings, corbels and valances we always apply the same aging technique to all of the parts to maintain a uniform appearance. We will not by default do the aging process to veneers or plywood products as this process generally will break through the veneers and make that product un-usable.
Default door used for Aged door with a 2 ¼” frame is called: NOBEL (E500, 201 (57.2), O, B)
Default door used for Aged door with a 3” frame is called: ROYAL (E500, 201 (76.2), O, B)
Default Wood Type for the Aging Process
Cherry or Alder are the recommended wood species when manufacturing cabinet doors and accessories for the aging process. Poplar can be substituted for Cherry or Alder when solid color paint is the chosen finish. Wood species such as Oak, Maple and Hickory are too dense and do not lend themselves to the aging process.
Aging Techniques Defined
| Rub-Through involves some corners and edges getting sanded to create a tasteful yet slightly old look. As the name suggests, the sanding on this technique does not round the corners aggressively but only removes a minor amount of wood. Outside corners and raised panel corners of the cabinet doors are sanded off prior to the stain/paint process and then sanded again after the staining/painting process. Some of the sharper edges are sanded off after the stain/paint process to help create the look of heavy use. The finished product is clear coated to preserve the look and seal up the raw wood that was exposed in the sanding process. This creates a very elegant look while creating the feel of an old high-quality kitchen. The Rub-Through technique is least aggressive of our aging looks. (Elias code = “RT”) Image shows Dark Espresso stain on Alder 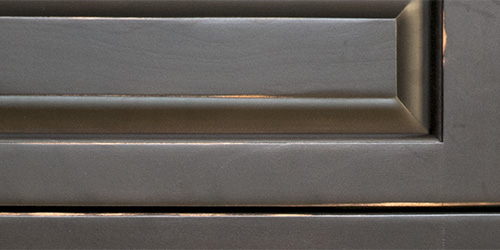 |
| Antiquing involves some corners getting sanded down, either on the frame or on the raised panel if applicable. We also sand some areas of the inside profiles so they are rounded off to help create a used look. The Antiquing is done prior to staining/painting and also after staining/painting. By doing this sanding after the stain/ paint, it creates a slow transition from a stained/painted product to the raw wood; this then creates a naturally worn look. Antiquing can be used on our stained products and solid color “painted” products. After the Antiquing has been done for the final time the doors are clear coated to preserve the finish and protect any bare wood. The difference between Antiquing and Rub-Through is that Antiquing has more aggressively sanded corners. This creates a more rustic look. (Elias Code = “A”) Image shows Cafe stain on Alder 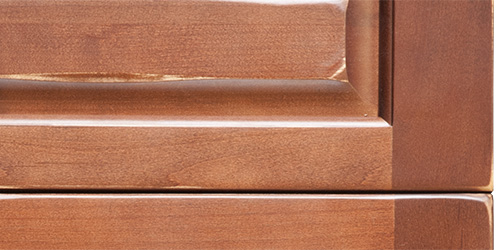 |
| Distressing is defined as the process of applying various light dents, light cutting and some randomly placed “worm holes” in the door. This distressed characteristic is applied with custom made tools and is applied randomly to each piece. The distressing also dictates the occasional cutting on the outside edge of the door; this cut is sanded smooth to the touch and adds to the overall “distressed” look. The joints on the door frame may also be cut to emphasize a crack. (This is a non-structural crack, made for appearance only). The distressing is done prior to staining/painting. Once the distressing has been completed the doors are clear coated to preserve their appearance. This distressing can be used on our stained and solid color “painted” products. (Elias Code = “D”) Image shows Sandstone lacquer on Yellow Poplar with Feathered Mocha Glaze 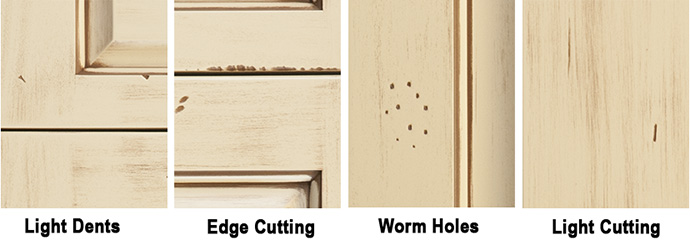 |
| Distressing/Antiquing is defined as combination of Distressing and Antiquing, as per the definitions above, applied to each door. The Distressing/Antiquing process is applied both prior to and after the staining/painting process. By doing this the stain or paint “feathers” off from raw wood to finished product creating a naturally worn and well used look. The product is then clear coated to preserve the look. The Distressing/Antiquing can be used on our stained products and solid color “painted” products. (Elias Code = “DA”) Image shows Cinnamon stain on Alder 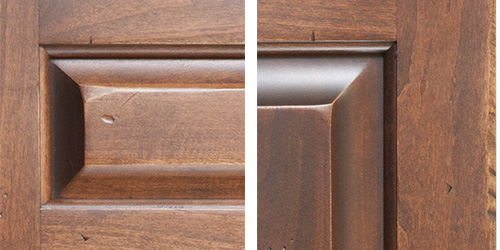 |
| Samples To be sure of whether any of these finishes are the right appearance for you or your customer, please order samples before starting a project. |
Stain & Clear Coat Finishing
Solid Color Lacquor Finishing Video

